
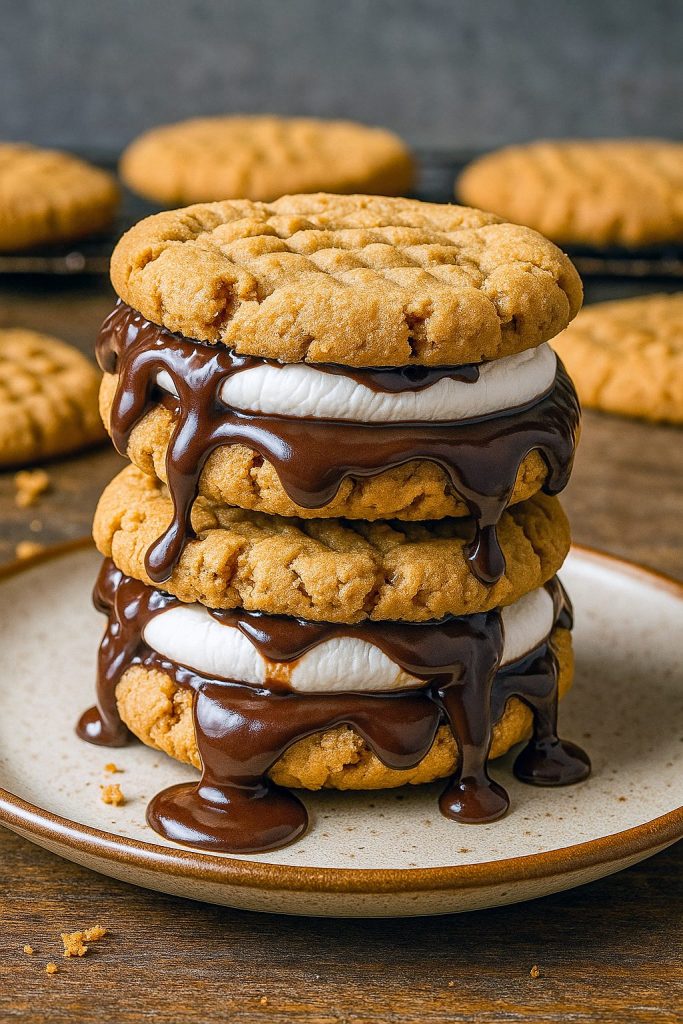
Imagine this: you’re back at summer camp, the air scented with pine needles and the crackle of a campfire—and somehow, you manage to capture that feeling in a cookie. Welcome to the world of Peanut Butter S’mores Sandwich Cookies, where nostalgia meets Next-Level Baking. These aren’t your average peanut butter cookies; they’re Fancy But Easy Recipes gold, with soft, chewy PB rounds hugging a pillowy marshmallow fluff center, all drizzled in molten chocolate and gooey peanut butter. Ready to wow everyone from your kiddos to the neighbors at the Cookies For Farmers Market table? Let’s dive in.
Who says you need a bonfire to enjoy s’mores? With these Peanut Butter Smores Cookies, you get all the toasty, gooey goodness right from your own oven—and minus the singed eyebrows. Bold tip: use creamy peanut butter for the silkiest dough and a peanut butter drizzle that stays beautifully fluid.
Why You’ll Flip Over These Cookies
- Soft & Chewy Base: The perfect peanut butter cookie texture—tender in the center, lightly crisp at the edges.
- Ultimate S’mores Flavor: Gooey marshmallow fluff + melted chocolate = campfire magic in every bite.
- Kid-Friendly Fun: Get the kids involved scooping dough, dolloping fluff, and drizzling chocolate. FYI, they’ll love it.
- Stress-Free Assembly: No fancy tools required—just bowls, spoons, and a piping bag (or zip-top bag with a corner snipped).
Curious how these rank among other Cookie Sandwiches Recipes? IMO, they’re the reigning champs—unstoppable at bake sales, holiday cookie swaps, or even just your afternoon coffee break.
Flavor Twists & Customization
Feeling adventurous? Mix in crushed graham crackers for extra texture, or swap dark chocolate for a richer bite. Crumble in mini marshmallows for pops of ooey-gooey joy. This is the kind of recipe where you can totally make it your own—talk about Fun Foods at their finest!
Quick Overview of the Process
- Cream & Combine: Whip peanut butter, butter, granulated sugar, and brown sugar until light and fluffy.
- Add Wet & Dry: Beat in egg and vanilla, then fold in flour, baking powder, and salt until a soft dough forms.
- Shape & Bake: Drop tablespoon scoops, flatten with a crisscross fork mark, and bake at 350°F until edges turn golden.
- Assemble S’mores Sandwich: Slather one cookie with marshmallow fluff, drizzle peanut butter, pour melted chocolate, and top with another cookie.
- Set & Enjoy: Let the sandwiches rest so the filling firms up, then dig in!
Bold point: don’t skip the 10–15 minute rest—this helps the chocolate layer set beautifully without turning into a sticky mess.
Perfect for Every Occasion
- Lunchbox Upgrades: Pack one alongside a fruit cup for an extra-special treat.
- Bake Sales & Markets: These beauties sell themselves—just label them Tasty Desserts or “campfire-inspired sandwich cookies.”
- Party Showstoppers: Arrange them on a platter with skewers of fruit and mini brownies for a dessert board that wows.
- Gift-Giving: Stack them in clear cellophane bags tied with ribbon; they make stellar homemade presents.
Are you hosting a potluck or picnic? These cookies belong front and center—they’re proof that Smores Ideas don’t end at the campfire.
Pro Tips for Cookie Perfection
- Don’t Overbake: Pull the cookies when centers look slightly underdone—they’ll finish firming up on the sheet.
- Warm Your Peanut Butter: Heat it briefly so it drizzles smoothly—too hot and it’ll melt your fluff!
- Cookie Size Matters: Make minis for cute bite-sized treats, or go jumbo for a decadent Peanut Butter Cookie Sandwich that doubles as dessert.
Storage & Make-Ahead Magic
- Room Temp: Store in an airtight container for up to 2 days—if they last that long.
- Refrigerate: Chill for up to 5 days; the cool temperature gives a nice chew to the chocolate layer.
- Freeze: Wrap each cookie sandwich well and freeze up to 1 month. Thaw in the fridge before serving.
Bold suggestion: assemble the cookies the day before your event—this gives the flavors time to meld and makes morning prep a breeze. These truly are Sweet Treats Easy To Make when you plan ahead.
So, what are you waiting for? Fire up that oven, line your baking sheets, and let’s put a gourmet spin on s’mores with these show-stopping Peanut Butter S’mores Sandwich Cookies. Whether it’s a cozy family night, a festive cookie swap, or a banner day at the farmers market, you’re about to redefine what it means to treat yourself. Ready, set, bake!

Fancy But Easy Recipes: Peanut Butter S’mores Sandwich Cookies
- Total Time: 32 minutes
- Yield: 12 sandwich cookies
Description
Experience the perfect blend of nostalgia and indulgence with these chewy peanut butter biscuits hugging layers of marshmallow fluff, warm peanut butter drizzle, and velvety melted chocolate.
Ingredients
For the Cookies
- 1½ cups (250 g) smooth peanut butter
- ½ cup (113 g) unsalted butter, softened
- ½ cup (100 g) granulated sugar
- ½ cup (100 g) packed light brown sugar
- 1 large egg, at room temperature
- 1 tsp pure vanilla extract
- 1¼ cups (160 g) plain all-purpose flour
- ¾ tsp baking powder
- ¼ tsp kosher salt
For the Filling
- 1 cup (96 g) marshmallow fluff
- ¼ cup (64.5 g) peanut butter, gently warmed
- ½ cup (84 g) milk chocolate chips
Instructions
- Prep Oven & Pan:
- Heat your oven to 350°F (175°C). Line a cookie sheet with parchment paper.
- Cream the Base:
- In a mixing bowl, beat together peanut butter, butter, granulated sugar, and brown sugar until light and airy (about 2–3 minutes). Mix in the egg and vanilla until smooth.
- Incorporate Dry Ingredients:
- In a separate bowl, whisk the flour, baking powder, and salt. Gradually add this to the wet mixture, stirring until a soft dough forms.
- Shape & Bake:
- Scoop out tablespoon-sized balls of dough and place them 2 inches apart on the prepared sheet. Use the tines of a fork to gently press down each ball in a crisscross pattern.
- Bake for 10–12 minutes, just until the edges turn golden. Let the cookies cool on the baking sheet for 5 minutes before transferring them to a wire rack.
- Melt the Chocolate:
- Place chocolate chips in a microwave-safe bowl and heat in 20-second bursts, stirring between intervals, until fully melted and glossy.
- Assemble the Sandwiches:
- Spread 1 tablespoon of marshmallow fluff onto the flat side of one cookie.
- Drizzle 1 teaspoon of warmed peanut butter over the fluff.
- Spoon or drizzle a layer of melted chocolate on top.
- Gently press a second cookie, flat side down, onto the filling to form a sandwich.
- Let the cookies rest at room temperature for 10–15 minutes—or refrigerate for 10 minutes—to let the layers set.
- Enjoy:
- Serve slightly chilled or at room temperature with a cold glass of milk.
Notes
Pro Tips & Variations
- Timing Is Everything: Remove the cookies when they’re just set—overbaking makes them too firm.
- Chocolate Swap: For deeper flavor, use dark or semi-sweet chips.
- Extra Crunch: Gently fold in ¼ cup of crushed graham crackers to the dough for authentic campfire vibes.
- Freezer-Friendly: Store assembled or unfilled cookies in an airtight container for up to 1 month. Thaw before serving.
- Prep Time: 20 minutes
- Cook Time: 12 minutes
- Category: Desserts