
Hey there, cheesecake fanatics! If you’ve ever wondered how to level up your dessert game, Butterfinger Cheesecake is about to become your new obsession. Picture this: a thick, creamy peanut butter cheesecake studded with crunchy Butterfinger bits, nestled in an Oreo crust, and drenched in a silky chocolate ganache. Intrigued yet?
I’ve been on a cheesecake binge lately—seriously, my mixer has never seen this much action. In the world of All Kinds Of Cheesecake, there’s something undeniably thrilling about experimenting with flavors, and let me tell you, peanut butter and Butterfinger make for a match made in dessert heaven. IMO, this might just be the Perfect Cheesecake for any celebration—from backyard BBQs to fancy brunches.
So, what makes this Ganache Cheesecake stand out? First up: the Oreo crust. Pro tip: bake the crust before adding the filling—it helps everything hold together like a boss. The subtle crunch of those Oreo crumbs lays the groundwork for a dessert that’s anything but ordinary.
Next, the cheesecake filling. We’re talking a full half-cup of creamy peanut butter blended with classic cream cheese, sugar, sour cream, and eggs. And because moderation is overrated, we toss in 1½ cups of chopped Butterfingers (that’s about 12 fun-sized bars). FYI, if your dentist asks why you’ve been scarfing down candy bars, just blame it on science.
Ever tried a water bath for your cheesecake? I know, I know—what a hassle, right? But trust me, a water bath is key to avoiding cracks, dryness, or that dreaded sunken middle. Bold move: invest the extra effort for a consistently smooth, creamy finish every single time.
Now, let’s talk toppings. After your cheesecake has baked, cooled, and chilled (patience, young grasshopper), it’s time for the showstopper: warm chocolate ganache poured over the top, followed by a generous sprinkle of more Butterfinger bits and a swirl of peanut butter whipped cream. That’s how you create a dessert that screams “luxury,” without breaking a sweat.
Wondering if this recipe belongs on your Easter table? Heck yes—it’s practically begging for an audience as Cheesecake For Easter, paired with pastel decorations and a side of spring sunshine. And if you’re aiming to boost your business, these Butterfinger Cheesecake Recipes are gold when you’re Selling Cheesecakes at markets or online. Trust me, people will line up for a slice.
But hey, let’s keep it real: this isn’t your average “dump-and-bake” situation. This ranks among Difficult Dessert Recipes, thanks to the water bath and multiple layers. Yet, if you follow each step (and resist the urge to devour every Butterfinger as you chop ’em), you’ll end up with a showstopper that’s worth every second.
What if you’re new to cheesecake making? No sweat. This recipe doubles as a crash course in mastering texture and flavor balance. Key takeaway: room-temperature ingredients blend more smoothly, so leave those cream cheese blocks out for at least an hour before you start.
Feeling adventurous? Try swapping in white chocolate ganache or adding a swirl of caramel before you bake. The sky’s the limit when it comes to Favorite Cheesecake Recipes—and yes, this Butterfinger version will top that list. It’s a scrumptious base for all kinds of riffing and remixing.
By now, you’re probably thinking: “Do I really need another cheesecake recipe in my life?” The answer is a resounding yes. Whether you’re a seasoned baker or a rookie in the kitchen, this Perfect Cheesecake ticks all the boxes: crunchy, creamy, sweet, salty, and utterly irresistible.
So, what are you waiting for? Grab your mixer, raid your candy stash, and let’s make magic happen. Remember: chilling time is non-negotiable—so plan ahead, kick back, and let your cheesecake set to perfection. Once that ganache glistens and the Butterfinger bits catch the light, you’ll know you’ve nailed it.
In the grand universe of Recipes Cheesecake, this Butterfinger masterpiece stands out as a crowd-pleaser that’s as fun to eat as it is to make. Who knew a candy bar could elevate a classic dessert into something downright legendary?
Ready to impress your friends, family, or anyone with a sweet tooth? Go on, give this Butterfinger Cheesecake a whirl. Your taste buds—and your Instagram feed—will thank you. And hey, if you’re feeling extra generous, send me a slice (just kidding… or am I?).
Happy baking, you dessert rockstars!

Butterfinger Cheesecake: The Perfect Cheesecake for Any Occasion
- Total Time: 3 hours 15 minutes
- Yield: 12-14 slices
Description
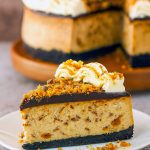
A luscious, ultra-creamy peanut butter cheesecake studded with chopped Butterfinger bars, all resting on a crispy chocolate-Oreo base. It’s finished with a glossy chocolate ganache, swirls of peanut butter whipped cream, and an extra sprinkle of Butterfinger pieces for maximum crunch!
Ingredients
For the Crust
- 2¼ cups Oreo cookie crumbs (about 302 g)
- 4 Tbsp (56 g) salted butter, melted
For the Cheesecake Filling
- 24 oz (678 g) cream cheese, softened to room temp
- 1 cup (207 g) granulated sugar
- 3 Tbsp (24 g) all-purpose flour
- ¾ cup (173 g) sour cream, room temperature
- ½ cup (140 g) creamy peanut butter
- 1 tsp pure vanilla extract
- 4 large eggs, at room temperature
- 1½ cups chopped Butterfinger bars (around 12 fun-sized pieces)
For the Chocolate Ganache
- 6 oz semi-sweet chocolate chips
- ½ cup heavy whipping cream
For the Peanut Butter Whipped Cream
- ¾ cup heavy whipping cream
- ½ cup (58 g) powdered sugar
- 2 Tbsp (35 g) peanut butter
- ¼ tsp vanilla extract
Extra
- Additional chopped Butterfingers, for garnish
Instructions
- Prep the Pan & Crust
- Preheat your oven to 325 °F (163 °C). Line a 9″ springform pan with parchment on the bottom and grease the sides.
- In a medium bowl, stir together Oreo crumbs and melted butter until evenly moistened. Press the mixture firmly into the bottom of the pan.
- Bake 10 minutes, then let cool. Wrap the outside of the pan in aluminum foil to waterproof it for the water bath (this prevents any steam or water from seeping in).
- Make the Filling
- Lower oven temp to 300 °F (148 °C).
- Roughly chop Butterfinger bars and set aside.
- In a large bowl, beat cream cheese, sugar, and flour on low speed until silky and lump-free—this minimizes air and helps prevent cracks. Scrape down the bowl.
- Add sour cream, peanut butter, and vanilla; mix on low until smooth.
- With mixer on low, incorporate eggs one at a time, pausing to scrape the bowl after each addition.
- Gently fold in the chopped Butterfinger pieces by hand.
- Bake in a Water Bath
- Pour filling over the cooled crust, smoothing the top.
- Place the springform pan inside a larger roasting pan. Pour hot water into the outer pan until it reaches halfway up the sides of the springform (but never above the foil!).
- Bake 1 hr 25 min, until the edges are set but the center still jiggles slightly.
- Turn off the oven; keep the door closed for 30 min to let it finish cooking gently.
- Crack the door open and let the cheesecake cool for another 30 min. This gradual drop in temperature helps avoid cracks.
- Remove from the oven and water bath, unwrap foil, and transfer to the fridge. Chill at least 5 hrs, preferably overnight.
- Prepare the Ganache & Whipped Cream
- Ganache: Place chocolate chips in a heatproof bowl. Heat the cream until steaming (but not fully boiling), then pour it over the chocolate. Let rest 2–3 min, then whisk until glossy and lump-free.
- Peanut Butter Whipped Cream: In a chilled bowl, whip heavy cream, powdered sugar, peanut butter, and vanilla on high until firm peaks form.
- Assemble & Serve
- Remove the cold cheesecake from the springform and place on your serving platter.
- Pour ganache over the top, letting it gently drip down the sides.
- Fit a piping bag with your favorite tip and pipe swirls of peanut butter whipped cream around the perimeter.
- Scatter extra chopped Butterfingers over the top for that signature crunch.
- Keep refrigerated until ready to slice. Best enjoyed within 3–4 days.
- Prep Time: 45 minutes
- Cook Time: 2 hours 30 minutes
- Category: Desserts
Nutrition
- Serving Size: 1 Slice
- Calories: 583
- Sugar: 42.2 g
- Sodium: 373.6 mg
- Fat: 36.4 g
- Carbohydrates: 56.1 g
- Protein: 12.3 g
- Cholesterol: 116.4 mg