There’s nothing more summery than sinking your spoon into a chilled Strawberry And Cream Cheesecake that tastes like your favorite childhood ice cream bar. Remember chasing down the ice cream truck as a kid, heart racing at the jingle? This no-bake wonder brings all those memories back—without the risk of sticky fingers or melting messes.
No-Oven, All-Fun
You read that right: no oven required. This easy Heavy Whipping Cream Recipes Desserts hack turns simple ingredients into a showstopping centerpiece. Seriously, who needs heat when you’ve got whipped cream, cream cheese, and fruity gelatin doing all the work? FYI, your kitchen stays cool—just like your guests will be when they find out how simple this is.
Crunchy Cookie Crust
Let’s talk crust. You blitz vanilla cream cookies in a food processor, then bind them with melted butter to create a sand-like base that freezes into a firm platform for our layers. Want a little extra crunch? Swap in Golden Oreos or toss in crushed pretzels. Who doesn’t love an unexpected twist under their cheesecake?
Gelatin Meets Cream Cheese
First, bloom that strawberry gelatin in boiling water—no refrigeration yet. Meanwhile, beat cream cheese and granulated sugar until smooth. When your gelatin cools (but stays pourable), split it and one whipped portion of your cream cheese mix, blending each half to velvety perfection. This is why we love Dessert Recipes Cheesecake—it’s creative but never fussy.
Whipped Cream Magic
In another bowl, whip heavy cream and powdered sugar into stiff peaks. Then fold half of it into the cream cheese and half into the strawberry mix. That light-and-luscious texture? Pure Strawberry Crunch Desserts delight. IMO, nothing beats that cloud-like consistency when you need a break from dense cakes.
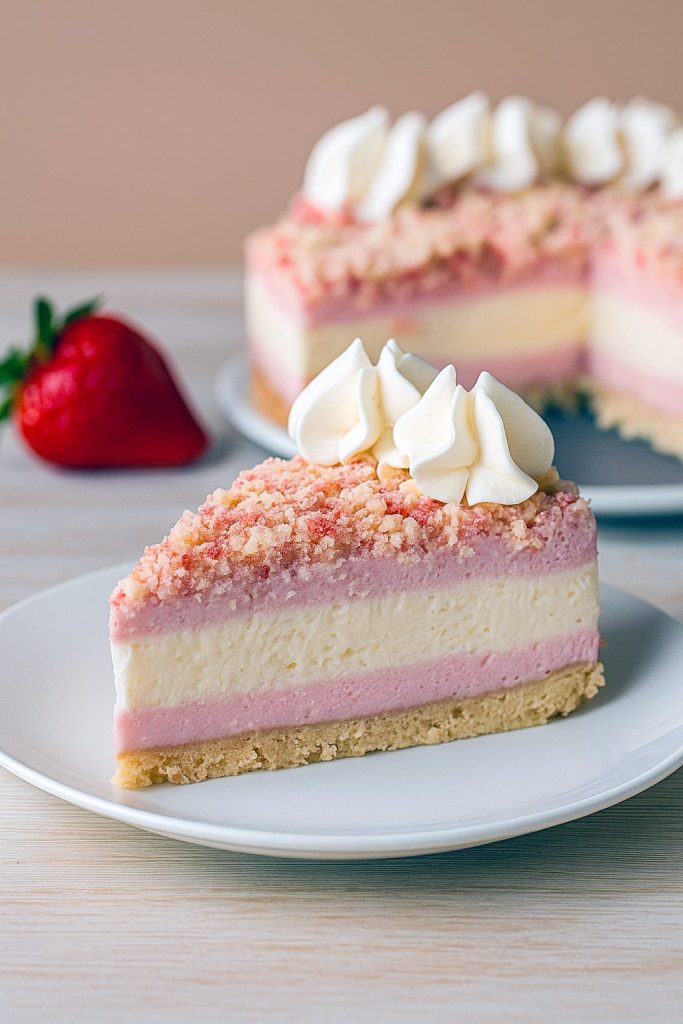
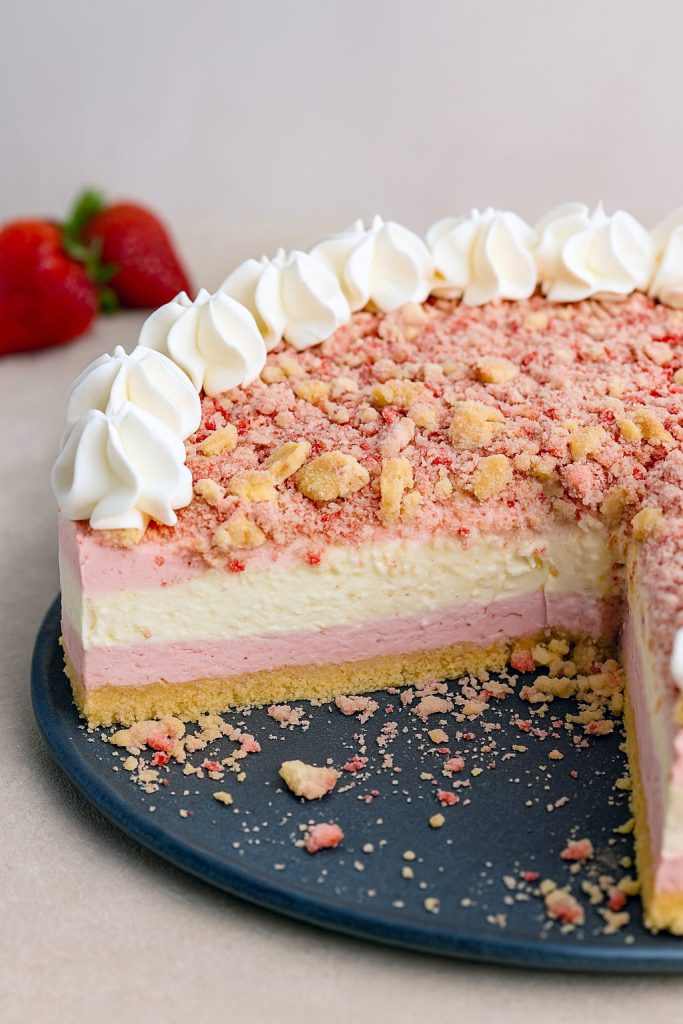
Layering Like a Pro
Pour half of your strawberry-cream blend over the chilled crust, then freeze for 15 minutes. Next, add the plain cream cheese layer, then finish with the remaining pink goodness. This step-by-step build-up mirrors a Strawberry Crunch Crumble Recipe—multiple textures in one bite. Pro tip: a quick pre-freeze ensures clean layers every time.
Cookie Crumble Topping
Now for the fun part: crushing the remaining vanilla cream cookies and strawberry wafers. Want a pop of color? Add a few drops of food coloring and mix until you get that perfect pastel pink. Sprinkle it generously over the set layers. As one of the Top Recipes On Pinterest, this dessert looks as good as it tastes—Instagram reels, anyone?
Chill Time Essentials
Cover and refrigerate for at least four hours. If you slice too soon, your layers might wobble; wait longer for a firm set. When you lift the springform pan off, you’ll reveal a flawless Strawberry Crunch Cheesecake Cake that practically begs for its close-up.
Serve with a Smile
Want to elevate your presentation? Pipe whipped topping around the edges with a star tip, then garnish with fresh strawberry slices. For a nostalgic twist, scoop some cheesecake into waffle cones—Fun Dessert Ideas that’ll have everyone smiling. Trust me, these cones vanish faster than regular sundaes.
Perfect Portion Bars
This recipe yields about 12 generous Strawberry Crunch Cheesecake Bars—ideal for sharing but honestly, you might want to guard your stash. Slice each bar about 2½×3 inches for the ultimate balance of crust, cream, and crunch.
Pro Tips & Variations
- Bold Tip: Always use full-fat cream cheese for the creamiest results.
- Swap in Golden Oreos or graham crackers for a twist.
- Store leftovers in an airtight container—these bars stay fresh for up to four days.
Ready to Impress?
Whether you’re hosting a backyard bash or craving a solo treat, this Strawberry Crunch Cheesecake checks every box: it’s creamy, crunchy, fruity, and no-bake. So grab your springform pan, fire up that food processor, and let’s get layering—your taste buds will thank you!

Decadent Strawberry and Cream Cheesecake Crunch
- Yield: 12
Description
Enjoy a taste of summer nostalgia with this no-bake Strawberry Crunch Cheesecake—it’s like catching the ice cream truck, but in dessert form. A crisp cookie crust supports layers of whipped strawberry filling and rich cream cheese, all topped off with a playful cookie crumble.
Ingredients
For the Crust
- 1 pound vanilla cream cookies (about 34 cookies), divided
- 6 tablespoons unsalted butter, melted
For the Filling
- 3.3-ounce package strawberry-flavored gelatin
- 1 cup freshly boiled water
- 16 ounces cream cheese, softened (two 8-ounce blocks)
- ¾ cup granulated sugar
- 2 cups heavy whipping cream
- ½ cup powdered sugar
- 10 strawberry wafer cookies (about 4 ounces)
For the Decorative Topping
- Approximately half a tub of thawed whipped topping, fitted into a pastry bag with a Wilton 1M star tip
Instructions
- Prepare the Crust
- Place 26 of the vanilla cream cookies into a food processor and pulse until they become fine crumbs.
- Pour in the melted butter and process until the mixture resembles damp sand.
- Firmly press the crumbs into the bottom of a greased 10-inch springform pan.
- Slide the pan into the freezer for 15 minutes to set.
- Make the Strawberry Layer
- In a bowl, whisk together the hot water and strawberry gelatin for about 2 minutes, until fully dissolved. Let this mixture cool at room temperature—do not refrigerate.
- In another bowl, beat the cream cheese and granulated sugar until completely smooth. Set aside.
- Whip the Cream
- In a clean mixing bowl, whip the heavy cream and powdered sugar on medium-high speed until stiff peaks form, scraping down the sides once.
- Divide the whipped cream evenly: fold half into the cream cheese mixture, and the other half into the cooled gelatin.
- Layer and Chill
- Pour half of the pink strawberry-cream mixture over the chilled crust and return the pan to the freezer for 15 minutes.
- Once slightly firm, spoon the cream cheese–whipped cream layer on top, smoothing it out gently.
- Finish with the remaining strawberry-cream blend as the top layer.
- Add the Crunchy Finish
- Coarsely break up the reserved vanilla cookies and the strawberry wafers—either pulse in the food processor briefly or crush in a sealed bag with a rolling pin.
- (Optional) Tint the crumbs with a few drops of pink food coloring for an extra pop.
- Scatter the colorful cookie pieces evenly over the cheesecake.
- Cover and refrigerate for at least 4 hours, or until fully set.
- Garnish and Serve
- When you’re ready to impress, pipe swirls of whipped topping around the edges or across the surface.
- Carefully release the springform pan sides, slice into wedges, and enjoy your homemade summer treat!
Notes
Chef’s Note:
- For a golden twist, swap in Golden Oreos for the crust.
- Store any leftovers in an airtight container in the fridge for up to four days.
- Category: Desserts