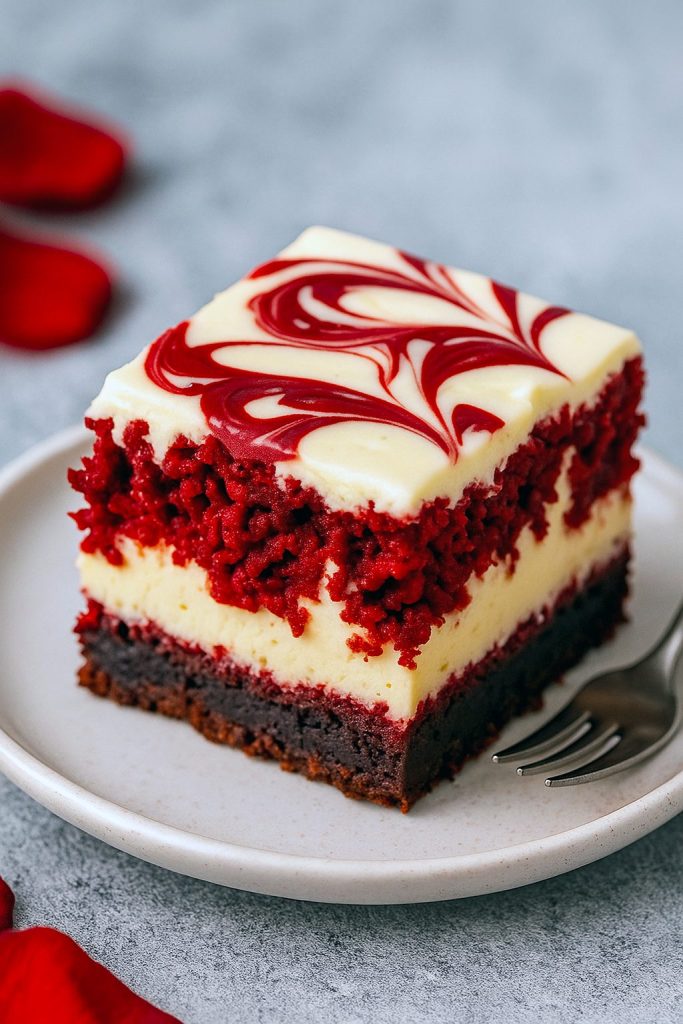
You know those desserts that stop you mid-bite and make you go, “Whoa, what is this?!” Yeah, these Red Velvet Cheesecake Dessert bars are that kind of dessert. We’re talkin’ a gooey, chocolatey red velvet base swirled with silky cheesecake that bakes up into the most gorgeous marbled masterpiece. Basically, it’s what happens when your favorite brownie and cheesecake fall in love and have a really delicious baby.
If you’re in the mood for rich Red Velvet Baking Recipes that look fancy but come together without a ton of fuss, this is your sign. These bars are decadent enough for a holiday spread but easy enough to whip up for your Tuesday night cravings (no judgment).
Let’s Start with the Brownie Base
So first thing’s first: crank your oven up to 350°F. Line an 8×8-inch pan with parchment paper (or grease it if you’re living dangerously). The red velvet layer starts with melted butter, cocoa powder, and sugar. Stir ’til smooth, then splash in some red food coloring, vanilla, and just a touch of vinegar to keep things zippy.
Now here’s the fun part: eggs and flour bring it all together into this glossy, rich batter that looks like a Valentine’s Day dream. You’ll hold back a little of it for swirling on top, but most of it gets spread into the pan as the base.
The Creamy Dreamy Cheesecake Layer
Okay, now for the good stuff. This is where Things To Bake With Cream Cheese really shine. Whip up softened cream cheese, a bit of sugar, an egg, and vanilla until smooth and luscious. No lumps allowed.
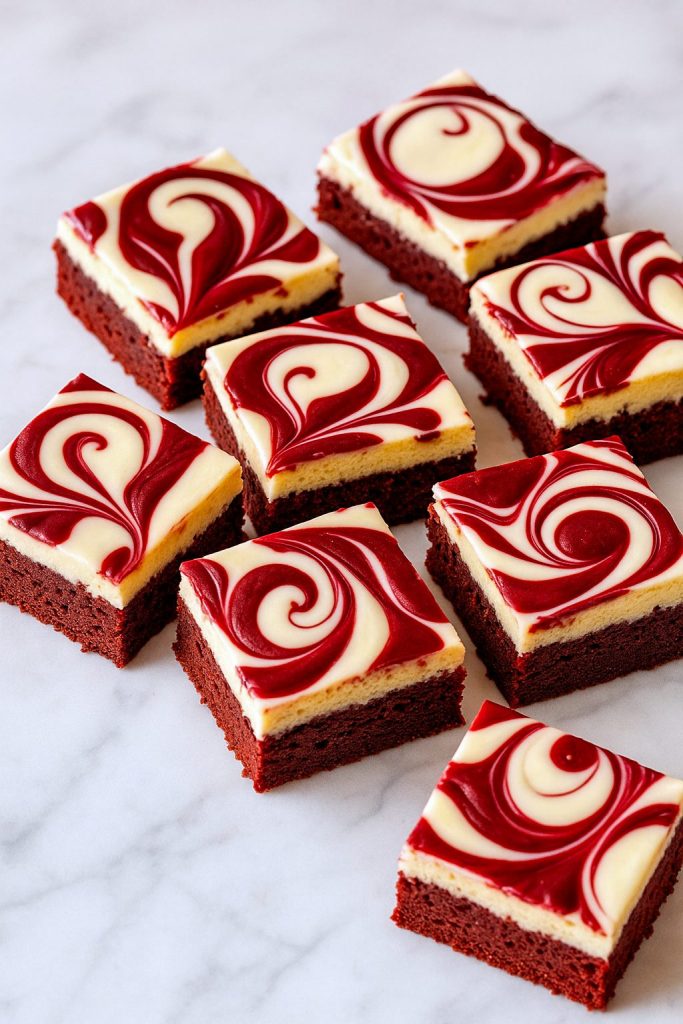
Spread that over your red velvet base, then dollop the reserved red velvet batter on top. Use a knife or toothpick to swirl things up like a dessert Picasso. Pro tip: don’t over-swirl. You want those bold red and white ribbons to pop.
Bake It, Baby
Pop it in the oven for 25-30 minutes, or until the center barely jiggles and a toothpick comes out with a few moist crumbs. Not raw, not dry—somewhere in that perfect fudgy middle. Remember, Holiday Desserts Chocolate are meant to be rich and indulgent, not cake-y and boring.
Let them cool completely (yes, this part is hard). Then slice into squares and marvel at your bakery-worthy creation.
Extra Tips Because You’re Fancy Like That:
Use room temp cream cheese for the smoothest cheesecake layer.
Don’t skip the parchment paper unless you love scraping pans.
Swirl lightly – we’re going for artistic, not chaotic.
Want to take it next level? Add chocolate chips or swirl in raspberry jam before baking. These little tweaks turn these bars into show-stopping Red Velvet Baking Ideas that everyone will rave about.
Need to Impress? Here’s When to Make Them:
- Date night? These are sweet Dessert Ideas For Two.
- Friendsgiving? Slide these into your Baking Recipes Thanksgiving lineup.
- Potluck? Bring these as Sweets For A Party and watch them vanish.
Basically, they fit in anywhere dessert is appreciated (aka everywhere).
Storage 411:
- Room temp? 2 days, airtight container.
- Fridge? Up to a week.
- Freezer? Yep. Wrap ‘em up tight and freeze for up to 3 months.
Just thaw before devouring. Or don’t. I’m not here to tell you how to live.
FAQs You Might Be Asking:
Can I make them gluten-free?
Absolutely. Use a 1:1 gluten-free flour blend. Just make sure it has xanthan gum.
Can I double the batch?
Heck yes. Use a 9×13 pan and add 5-10 minutes to the baking time.
What makes red velvet different from regular brownies?
Red velvet has cocoa, but it’s not as chocolate-forward. The vinegar and food coloring give it a signature tang and that vibrant red color.
Final Thoughts
If you’ve been hunting for Baked Sweet Recipes that are equal parts easy and gorgeous, bookmark this one ASAP. The combo of fudgy brownie and creamy cheesecake is ridiculously good, and the red velvet swirl? Chef’s kiss. It’s one of those Red Velvet Baking Recipes you’ll pull out again and again—for holidays, parties, or just because Tuesday needed a glow-up.
Now go swirl, bake, and wow your tastebuds!
Red Velvet Cheesecake Dessert Bars Everyone Will Love
- Total Time: 50 minutes
- Yield: 12-14 Brownies
Description
If you love your dessert bars creamy, chocolatey, and eye-catchingly beautiful, these Red Velvet Cheesecake Bars are calling your name. Imagine a rich, red cocoa base layered with tangy cheesecake and swirled to perfection. They’re bold, decadent, and totally irresistible—ideal for holidays, Valentine’s Day, or a casual “I need dessert now” kind of night.
Ingredients
For the Red Velvet Layer:
- ½ cup unsalted butter, melted
- 1 cup white sugar
- 2 eggs
- 1 teaspoon vanilla extract
- 1 tablespoon red food dye
- 1 tablespoon unsweetened cocoa powder
- ¾ cup all-purpose flour
- ¼ teaspoon salt
For the Cheesecake Swirl:
- 8 oz cream cheese, softened
- ¼ cup sugar
- 1 egg
- ½ teaspoon vanilla extract
Instructions
- Get Set Up
- Start by turning your oven to 350°F (175°C). Grab an 8×8-inch baking pan and line it with parchment paper. Leave some overhang so you can lift the bars out easily once they’re baked and cooled.
- Mix Up the Red Velvet Base
- In a large bowl, stir the melted butter and sugar together until smooth and glossy. Add the eggs one at a time, mixing well. Stir in vanilla and red food coloring—don’t be shy with the color!
- Sift in the cocoa powder, flour, and salt. Gently fold everything together just until no streaks of flour remain. Be sure not to overwork the batter—you want it soft and fudgy, not tough.
- Whip the Cheesecake Filling
- In another bowl, beat the softened cream cheese with sugar until silky. Add the egg and vanilla and keep mixing until creamy and lump-free. This layer adds that dreamy, tangy contrast to the rich red velvet below.
- Build the Layers
- Spoon most of the red velvet batter into your prepared pan, saving a few scoops for the top. Spread it into an even layer.
- Pour the cheesecake mixture on top and smooth it gently across the surface.
- Dollop the remaining red velvet batter randomly over the cheesecake, then drag a knife or skewer through the batter to create a marbled design. Pro tip: don’t go swirl-crazy—just a few swipes will give you those Insta-worthy red-and-white ribbons.
- Bake It Off
- Pop the pan in the oven and bake for 30–35 minutes. You’ll know they’re done when the edges look set and a toothpick poked into the center comes out with just a few moist crumbs.
- Cool and Chill
- Let the bars cool in the pan on a rack. Once they’re room temp, transfer them to the fridge for at least 30 minutes. Chilling helps them slice cleaner—and honestly, they taste amazing cold.
- Slice and Serve
- Lift the whole slab out using the parchment and cut into neat squares. Serve as is or top with whipped cream, powdered sugar, or a drizzle of chocolate if you’re feeling extra fancy.
Notes
Recipe Tips & Tweaks
- No red dye? Totally fine. Just skip it or use natural alternatives like beet powder, but keep in mind the color won’t be as bold.
- Add some texture. A handful of white or dark chocolate chips stirred into the red velvet layer adds a fun little surprise in every bite.
- Want a fruity twist? Swirl in some raspberry jam along with the cheesecake for a berry-chocolate vibe.
How to Store Them
- Fridge: Store in an airtight container for up to 5 days.
- Freezer: Want to stash some for later? Wrap slices tightly in plastic and freeze for up to 3 months. Thaw in the fridge or at room temp before enjoying.
These Red Velvet Cheesecake Bars are the kind of dessert that turns heads and wins hearts. With their creamy swirl, fudgy texture, and rich flavor, they’re a guaranteed hit—whether you’re whipping up holiday desserts chocolate lovers will rave about or looking for new red velvet baking ideas to add to your repertoire. They also make sweet little dessert ideas for two, cute baked sweet recipes for gifts, or bold sweets for a party table spread.
- Prep Time: 15 minutes
- Cook Time: 35 minutes
- Category: Desserts